This is a comprehensive guide for migrating scheduling and appointment components from Calendly to Omnix. The goal is to ensure a smooth transition, maintaining scheduling functionality and automation while taking advantage of Omnix’s expanded features.
IMPORTANT: Make sure you migrate all of the following components when migrating from Calendly to Omnix.

1. Users
2. Calendar Configuration
3. Availability Settings
4. Video Conferencing
5. Payment Collection
6. Calendars (Event Types)
7. Workflows (Automations)
TABLE OF CONTENTS
- Migrate Users
- Migrate Calendar Configurations
- Migrate Availability Settings
- Configure Video Conferencing
- Configure Payment Collection
- Migrate Calendars (Event Types)
- Migrate Workflows (Automations)
- Migrate Contacts
- Additional Migration Considerations
- Frequently Asked Questions
Migrate Users
Calendly Supports multiple users in a Calendly Organization(think of this as an Agency level.) Each user gets their own Calendly account and individual Calendly page, along with event types you assign to their account.
Admins and Owners of Calendly organizations can download a list of organization members in their Calendly organization which shows the following for every member. This list will help us ensure the users are added to the Omnix subaccount.
Step 1: Export a list of Calendly Users
- Log in to Calendly: At the top right corner of any Calendly page, select Account > Users. Select Export. A CSV file will be downloaded.
Step 2: Add and Assign Users to the Omnix Subaccount
- Log in to Omnix: Go Agency Settings > Team. Verify users in Calendly are added and assigned to the Omnix Subaccount.
- Use the + Add Employee to add missing users. Use the calendly export to determine the user's role.

Migrate Calendar Configurations
Calendly syncs availability Google Calendar, Outlook, and iCloud calendars to ensure that events are scheduled based on user availability. Omnix offers a similar feature to prevent double bookings.
IMPORTANT: Perform the following steps for each user you're migrating.
Step 1: Disconnect Google Calendar from Calendly
- Access Calendar Sync Settings: In Calendly, navigate to Account > Calendar Sync.
- Disconnect Calendar: Disconnect your Google Calendar/Outlook Calendar from Calendly.
Step 2: Connect Google Calendar to Omnix
- Navigate to Integrations: In Omnix, go to Settings > Integrations.
- Connect Google Calendar and Outlook: Select Google and follow the prompts to sign in and connect your calendar. Omnix will check for conflicts based on your availability in Google Calendar.
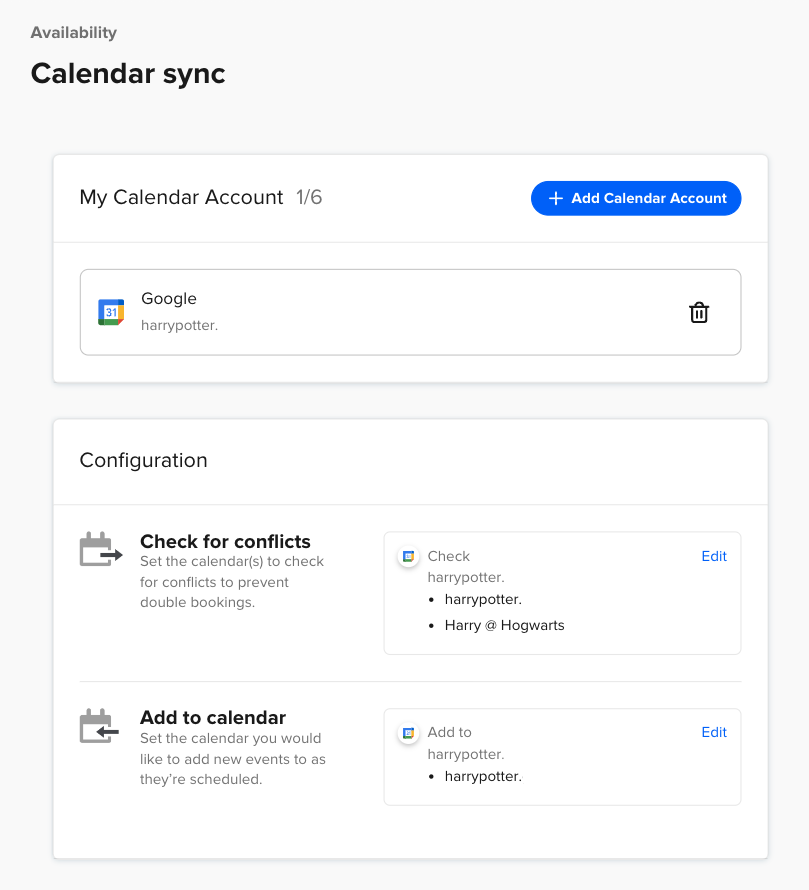
- Set Sync Preferences: Go to Calendars > Calendar Settings > Connections. Configure whether you want Omnix to sync cancellations and other preferences similar to what was set in Calendly.
Step 3: Post-Migration Check
- Test Calendar Sync: Schedule a test event in Google and verify that it appears as blocked in Omnix Calendars and that any other existing busy events in Google Calendar are respected in Omnix Calendars.
Migrate Availability Settings
Calendly offers several scheduling settings, including time increments, availability, and timezone management. These settings need to be replicated in Omnix to maintain consistency in scheduling.
Step 1: Document Scheduling Settings
- Review Existing Settings: In Calendly, document your current scheduling settings, including available hours, buffer times, minimum notice, daily limits, and time zone display settings.
Step 2: Set Up Scheduling in Omnix
- Availability Settings: In Omnix, navigate to the Availability settings under the specific calendar you’ve created. Set your available hours, buffer times, and daily limits according to the documented settings from Calendly.
- Time Zone Settings: Ensure that the time zone is correctly configured in Omnix location, and user profiles matching the display settings used in Calendly.
Step 3: Post-Migration Check
- Verify Availability: Check the calendar in Omnix to confirm that available times match what was set in Calendly and that buffer times and other restrictions are correctly applied.
Configure Video Conferencing
Calendly integrates with Zoom to automatically generate meeting links for scheduled events. This functionality can be replicated in Omnix.
Step 1: Disconnect Zoom from Calendly
- Access Integrations: In Calendly, go to Integrations > Zoom.
- Disconnect Zoom: Follow the steps to disconnect your Zoom account from Calendly.
Step 2: Connect Zoom to Omnix
- Navigate to Integrations: In Omnix, go to Settings > Calendar > Connections.
- Connect Zoom: Select Zoom and sign in to your account. Authorize Omnix to access your Zoom account.
- Set Zoom as Default Location: In your calendar settings in Omnix, set Zoom as the default location for your appointments if applicable.

Configure Payment Collection
All event types in Calendly support payments. Personal event types (one-on-one and group) will be connected to your Stripe account and team event types (round robin and collective) will be connected to the Calendly owner’s Stripe account. Guide the customer on creating additional locations to support connecting multiple Stripe accounts.
Step 1: Disconnect Stripe from Calendly
- Log into Calendly: To disconnect Stripe from your Calendly account completely, visit the Integrations page, select the option for Stripe and click Disconnect.
IMPORTANT: Any event types accepting payments in your Calendly account will become FREE once Stripe is disconnected.
Step 2: Connect Stripe in Omnix
- Log into Omnix Subaccount: Add the payment gateways first from your sub-account by going to the Payments Tab > Integration.
Step 3: Enable Payment Collection in Calendars
Migrate Calendars (Event Types)
In Calendly, calendars are referred to as Event Types. These are used to schedule meetings, collect payments, and gather additional information from contacts. In Omnix, similar functionality is achieved through its appointment scheduling system.
Step 1: Document Event Types
- List Event Types: In Calendly, identify and document each event type you’ve created, including its name, duration, location, and associated settings.
- Note Specifics: Include details like buffer times, minimum notice, daily limits, and any custom fields used for gathering additional information from invitees.
Step 2: Recreate Event Types in Omnix
- Access Calendars in Omnix: Navigate to Calendars > Calendar Settings in Omnix.
- Create New Appointment Type: Select Create New Calendar to start setting up a new appointment type.
- Configure Appointment Details: Set the name, duration, location (Date-Specific Hours), and other settings such as buffer times, minimum notice, and daily limits. Add Team members to Calendars. This corresponds to the Event Type settings in Calendly.
- Custom Fields: If your Calendly event types collected additional information (e.g., questions or forms), click here to learn how to recreate these as custom fields in Omnix Forms.
Step 3: Share Scheduling Links
- Generate and Share Link: After setting up each appointment type, generate the corresponding scheduling link in Omnix. Share these links with your team or embed them in your website and emails, replacing the old Calendly links.
Step 4: Post-Migration Check
- Test Booking Process: Ensure that the booking process works as expected by performing a test booking through the new Omnix appointment link. Verify that all settings (e.g., buffer times, form questions, notifications, Zoom link) function correctly.

Migrate Workflows (Automations)
Calendly workflows automate tasks such as sending reminder emails or follow-up messages. Omnix offers similar automation capabilities through its Workflows feature.
Step 1: Document Existing Workflows
- Review Workflows in Calendly: From your Calendly home page, select Workflows from the navigation panel on the left-hand side. Document the workflows you have set up in Calendly, including triggers (e.g., event creation, event cancellation) and actions (e.g., send email, send SMS).
Step 2: Recreate Workflows in Omnix
- Access Workflows: In Omnix, navigate to Automation > Workflows.
- Create New Workflow: Select Create New Workflow and set up the conditions and actions that match those documented from Calendly. Use Omnix’s trigger options to start the workflow based on similar events (e.g., appointment booked, appointment canceled, appointment no show).
- Customize Messages: Customize any email or SMS messages that are part of the workflow, using Omnix’s variables for personalization.
Step 3: Post-Migration Check
- Test Workflow Execution: Create a test appointment and observe whether the workflows trigger as expected. Ensure that messages are sent at the correct times and with the correct content.

Migrate Contacts
Before fully transitioning, it’s essential to export appointment data from Calendly, which hold contact information, to ensure nothing is lost during migration.
Step 1: Export Event Details
- Filter Events in Calendly: In Calendly, filter events to show the ones you need to export (e.g., past 30 days, specific event types). On your Home page, select Meetings.
- Export to CSV: At the top right of the Scheduled Events page, select Export to download event details in a CSV format. This file will include invitee contact information, event types, dates, locations, and more.
Step 2: Prep CSV Data and Import Contacts to Omnix
- Troubleshooting Bulk Imports Via CSV

Additional Migration Considerations
Training and Support
- Internal Training: Provide training sessions for team members on how to use Omnix, focusing on features that differ from Calendly.
- Access Support: Ensure that the client's team knows how to access Omnix’s support resources for any scheduling-related questions.
Migrate Other Apps
- Calendly is a single feature: Are there more tools in the client tech stack? Use our software guides to help the client migrate other software.

Frequently Asked Questions
How do I export the list of users from Calendly?
To export a list of users from Calendly, you need to log in to your account, navigate to the Account section and then Users, and select the Export option, which will download a CSV file with all user details.
When you want to disconnect your calendar from Calendly and connect it to Omnix, you should first open your Calendly account settings, then go to Calendar Sync and disconnect your current calendar (such as Google or Outlook). After disconnecting, open Omnix, navigate to Settings followed by Integrations, and connect your calendar account there. To complete the process, set your sync preferences by going to Calendars, then Calendar Settings, and finally Connections to ensure everything is configured correctly.
How do I add and assign users to the Omnix subaccount?
To add and assign users to the Omnix subaccount, you need to navigate to Agency Settings and then Team in Omnix, verify which users are already in the system, and use the + Add Employee button to add any users who are missing based on your Calendly export.
How do I disconnect my calendar from Calendly and connect it to Omnix?
To move your calendar connection from Calendly to Omnix, start by opening your Calendly account settings. From there, go to the Calendar Sync section and disconnect your current calendar, like Google or Outlook. Once that’s done, open Omnix and go to Settings, then Integrations, where you can connect your calendar account. After connecting, finish by setting your sync preferences by navigating to Calendars, then Calendar Settings, and finally Connections to make sure everything is working the way you need.
How do I set up availability settings in Omnix to match my Calendly configuration?
To set up availability settings in Omnix that match your Calendly configuration, you should first document your existing Calendly settings, such as your available hours and buffer times, and then go to the specific calendar's Availability settings in Omnix and configure them to match your documented settings.
How do I integrate Zoom with Omnix for video conferencing?
To integrate Zoom with Omnix for video conferencing, you first need to disconnect Zoom from Calendly by going to Integrations, then Zoom in Calendly and disconnecting it. Next, connect Zoom in Omnix by navigating to Settings, then Calendar, followed by Connections, where you'll select Zoom, sign in, and set it as the default location if needed.
How do I set up payment collection with Stripe in Omnix?
To set up payment collection with Stripe in Omnix, begin by disconnecting Stripe from Calendly by going to Integrations, then Stripe in Calendly and clicking Disconnect. Then connect Stripe in Omnix by going to the Payments Tab, followed by Integration, adding Stripe, and enabling it in your calendars.
How do I recreate my event types from Calendly in Omnix?
To recreate your event types from Calendly in Omnix, you should document your existing Calendly event types including details like name, duration, and location, then in Omnix, go to Calendars, then Calendar Settings, create new calendars, and configure the details to match your documentation.
How do I migrate my workflows (automations) from Calendly to Omnix?
To migrate your workflows (automations) from Calendly to Omnix, document your Calendly workflows including triggers and actions, then in Omnix, navigate to Automation, then Workflows, and create new workflows with matching triggers and actions.
How do I export contact data from Calendly and import it into Omnix?
To export contact data from Calendly and import it into Omnix, first export your data in Calendly by going to Home, then Meetings, filtering events, and selecting Export to download a CSV with contact details. Then prepare the CSV and follow Omnix's bulk import process for contacts.
What are the key post-migration checks I should perform to ensure everything is working correctly?
Test calendar sync by scheduling a test event in your connected calendar and verifying it appears in Omnix. Check availability settings to ensure they match your previous configuration.
Book a test appointment to confirm workflows, notifications, and integrations (e.g., Zoom, Stripe) function properly. Verify that contacts have been imported correctly.
Can I use the same Calendly account in multiple Omnix subaccounts while I migrate?
Yes. You can connect the same Calendly account in each Omnix subaccount you belong to. Each user can still connect only one Calendly account per subaccount.